This is a demo store. No orders will be fulfilled.

PE Antibody Labeling Kits(PE抗体标记试剂盒)

有货

库存信息

关闭

库存信息

关闭

库存信息

关闭
货号 (SKU) 包装规格 是否现货 价格 数量
P598273-50μg
50μg 现货 Stock Image
P598273-100μg
100μg 现货 Stock Image
P598273-500μg
500μg 现货 Stock Image

基本描述

英文名称 PE antibody labeling kits
储存温度 避光,-20°C储存
运输条件 超低温冰袋运输
产品介绍

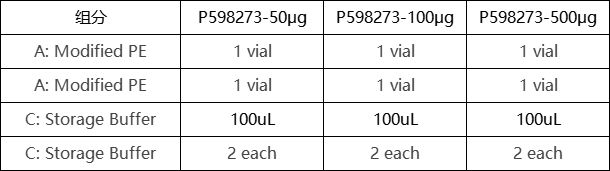
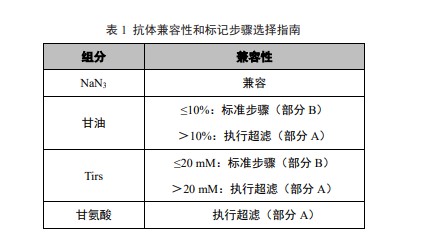
PE抗体标记可以兼容NaN3、低浓度的甘油、Tris和甘氨酸。试剂盒里提供的微型超滤离心管可以在标记前快速去除不兼容的小分子抗体稳定剂。

组分:


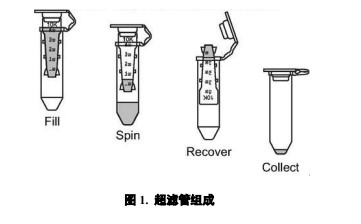
注意事项:

1. 管子从冰箱拿出需先恢复至室温,再揭开管子封口膜打开产品,避免产品回潮,影响产品使用效果。

应用范围:

抗体标记

使用方法:
PE 抗体标记试剂盒适合标记抗体。我们不建议标记其他蛋白质,因为标记的 DOL(degree of labeling)可能达不到较好值。
检查你的抗体与抗体兼容性指南。如果你的一抗是商业产品,请联系供应商以获取抗体浓度和配方。不含稳定剂的抗体溶液可以得到较好的标记结果,而标准的标记步骤可以兼容低浓度的 Tris 和甘油,标记液不受 NaN3的影响。对于标准的标记步骤(B),根据需要标记的抗体的 μg 数量选择试剂盒的规格。去除非蛋白成分如 Tris、甘氨酸或甘油,可以用试剂盒中提供的超滤管来纯化您的抗体,步骤如下(A)。
标记效率较高的抗体浓度为 1 mg/mL。超滤管可用于浓缩抗体(或清洗抗体)。为定量未知浓度的抗体,UElandy 提供WonderOrange™ 蛋白质定量试剂盒(W6006),一种高度敏感性的蛋白质荧光定量测定试剂盒。如果不需要去除或浓缩抗体,则按照标准步骤(B)进行实验。

A. 超滤步骤
重要:在您开始之前,对照表 1(抗体兼容性和标记步骤选择指南)确定您的抗体在标记前是否需要超滤。如果有必要,联系抗体厂家了解抗体和抗体稳定剂的浓度。如果您的抗体不需要超滤,根据表 1 选择合适的标记步骤。超滤膜截留的分子量为 10 kDa,因此,小于 10 kDa 将可以通过膜,而分子大于 10 kDa 的,包括抗体,将保留在超滤管中(图 1)。注意不要用吸管触碰膜,这会撕裂或穿刺膜,导致抗体损失。
超滤管性能
最大样本体积:500 μL 最终浓缩体积:15-20 μL
滤液接收器体积:500 μL
滞留体积(膜/支持):< 5 μL
1. 添加适量的抗体至超滤管中,小心不要触碰膜。14000 ×g 离心 2 min,使液体过滤进收集管,去除收集管中的液体。
2. 对于浓缩抗体,进行第 3 步。对于纯化抗体,加入等体积 1× PBS(PH 7.2)至超滤管中。14000 ×g 离心 2 min 使液体过滤进收集管,去除收集管中的液体。重复清洗 2-3 次。
3. 添加适当体积的 1× PBS(PH 7.2)至超滤管中,使得最终的抗体浓度为 1 mg/mL,小心吹吸 PBS 以重悬抗体。
4. 将上述超滤管倒放入新的收集管中,1000 ×g 离心 2 min,将收集管中的抗体转移至干净的 EP 管中。


B. 标准的标记步骤
重要:在您开始之前,对照表 1(抗体兼容性和标记步骤选择指南)确定您的抗体组成和浓度是否适用于该试剂盒标记,以及哪种标记步骤适合您选择。如果有必要,联系抗体厂家了解您的抗体和抗体稳定剂的浓度。
1. 抗体浓度 1 mg/mL 是较合适的标记浓度。如果抗体是冻干形式或浓度更浓,用 1× PBS(PH 7.2)溶解或稀释抗体。将需要标记的抗体转移到干净的管子里。确保待标记的抗体量匹配试剂盒的标记范围。
2. 将 Linking Reagent 恢复室温。短暂离心试剂管将粉末集中到底部。
3. 将抗体(1 mg / mL)转移至含有 Linking Reagent 的管中,溶解混匀,室温(20-25℃)摇晃反应 1h。
4. 将上步的溶液全部转移至超滤管中,加入 200 μL 1× PBS(PH 7.2),14000 ×g 离心 2 min。抗体将残留在超滤管中,丢弃收集管中的液体。
5. 重复清洗一次。
6. 将上述超滤管倒放入新的收集管中,1000 ×g 离心 2 min,向收集管中加入适量的 1×PBS(PH 7.2),根据添加到反应中的抗体量,将抗体重新悬浮到最终浓度为 1 mg/mL。
7. 将收集管中的抗体转移至含有 Modified PE 的管中溶解混匀。室温(20-25℃)避光摇晃孵育 4h。
8. 向上步反应溶液中加入 1/10 体积的 Storage Buffer,涡旋混匀,室温(20-25℃)避光摇晃孵育 1h。
9. 修饰好的抗体可直接用于染色,如需-20℃保存,则需另加入等体积甘油。

PE antibody labeling can be compatible with NaN3, low concentrations of glycerol, Tris, and glycine. The micro ultrafiltration centrifuge tube provided in the kit can quickly remove incompatible small molecule antibody stabilizers before labeling. We also provide enzyme labeled and fluorescently labeled Aladdin ® Kit (please visit www.uelandy.com).

Component:


Matters needing attention:

1. when the tube is taken out of the refrigerator, it should be restored to room temperature first, and then the tube sealing film should be opened to open the product, so as to avoid moisture regain and affect the use effect of the product.

Scope of application:

Antibody labeling

Usage:
The PE antibody labeling kit is suitable for labeling antibodies. We do not recommend labeling other proteins as the labeled DOL (degree of labeling) may not achieve good values.
Check your antibody and antibody compatibility guidelines. If your primary antibody is a commercial product, please contact the supplier for antibody concentration and formula. Antibody solutions without stabilizers can achieve good labeling results, while standard labeling steps are compatible with low concentrations of Tris and glycerol, and the labeling solution is not affected by NaN3. For the standard labeling step (B), label the antibody according to the desired μ Select the specifications of the reagent kit for the quantity of g. To remove non protein components such as Tris, glycine, or glycerol, your antibody can be purified using the ultrafiltration tube provided in the kit, as follows (A).
The antibody concentration with higher labeling efficiency is 1 mg/mL. Ultrafiltration tubes can be used to concentrate antibodies (or clean antibodies). To quantify unknown concentrations of antibodies, UElandy provides WonderOrange ™ Protein quantification kit (W6006) is a highly sensitive protein fluorescence quantification kit. If it is not necessary to remove or concentrate antibodies, follow standard steps (B) for the experiment.

A. Ultrafiltration steps
Important: Before you start, refer to Table 1 (Antibody Compatibility and Labeling Steps Selection Guide) to determine if your antibodies require ultrafiltration before labeling. If necessary, contact the antibody manufacturer to inquire about the concentration of antibodies and antibody stabilizers. If your antibody does not require ultrafiltration, choose the appropriate labeling step according to Table 1. The molecular weight intercepted by the ultrafiltration membrane is 10 kDa, so molecules smaller than 10 kDa can pass through the membrane, while molecules larger than 10 kDa, including antibodies, will be retained in the ultrafiltration tube (Figure 1). Be careful not to touch the membrane with a straw, as this can tear or puncture the membrane, leading to antibody loss.
Performance of ultrafiltration tubes
Maximum sample volume: 500 μ Final concentrated volume: 15-20 μ L
Volume of filtrate receiver: 500 μ L
Retention volume (membrane/support):<5 μ L
1. Add an appropriate amount of antibodies to the ultrafiltration tube, being careful not to touch the membrane. fourteen thousand × Centrifuge for 2 minutes to filter the liquid into the collection tube and remove the liquid from the collection tube.
For concentrated antibodies, proceed to step 3. For purified antibodies, add an equal volume of 1 × Transfer PBS (pH 7.2) into the ultrafiltration tube. fourteen thousand × Centrifuge for 2 minutes to filter the liquid into the collection tube and remove the liquid from the collection tube. Repeat cleaning 2-3 times.
3. Add an appropriate volume of 1 × Transfer PBS (pH 7.2) into the ultrafiltration tube to achieve a final antibody concentration of 1 mg/mL, and carefully aspirate PBS to resuspend the antibody.
4. Invert the above-mentioned ultrafiltration tube into a new collection tube, 1000 × Centrifuge for 2 minutes and transfer the antibodies from the collection tube to a clean EP tube.

B. Standard marking steps
Important: Before you start, refer to Table 1 (Antibody Compatibility and Labeling Steps Selection Guide) to determine if your antibody composition and concentration are suitable for labeling with the kit, and which labeling steps are suitable for your selection. If necessary, contact the antibody manufacturer to inquire about the concentration of your antibodies and antibody stabilizers.
1. An antibody concentration of 1 mg/mL is a suitable labeling concentration. If the antibody is in freeze-dried form or at a higher concentration, use 1 × Dissolve or dilute antibodies with PBS (pH 7.2). Transfer the antibody that needs to be labeled into a clean tube. Ensure that the amount of antibody to be labeled matches the labeling range of the reagent kit.
2. Restore the Linking Reagent to room temperature. A brief centrifugation reagent tube concentrates the powder to the bottom.
3. Transfer the antibody (1 mg/mL) to a tube containing Linking Agent, dissolve and mix well, and shake at room temperature (20-25 ℃) for 1 hour.
4. Transfer all the solution from the previous step to the ultrafiltration tube and add 200 μ L 1 × PBS (pH 7.2), 14000 × Centrifuge for 2 minutes. Antibodies will remain in the ultrafiltration tube and the liquid in the collection tube will be discarded.
5. Repeat the cleaning process once.
6. Invert the above-mentioned ultrafiltration tube into a new collection tube, 1000 × Centrifuge for 2 minutes and add an appropriate amount of 1 to the collection tube × PBS (pH 7.2), resuspend the antibody to a final concentration of 1 mg/mL based on the amount of antibody added to the reaction.
7. Transfer the antibodies from the collection tube to a tube containing Modified PE, dissolve and mix well. Incubate at room temperature (20-25 ℃) for 4 hours, avoiding light and shaking.
8. Add 1/10 volume of Storage Buffer to the reaction solution, vortex mix well, and incubate at room temperature (20-25 ℃) in the dark for 1 hour.
9. The modified antibody can be directly used for staining. If it needs to be stored at -20 ℃, an equal volume of glycerol needs to be added.

质检证书(CoA,COO,BSE/TSE 和分析图谱)

C of A & Other Certificates(BSE/TSE, COO):
输入批号以搜索分析图谱:

通过匹配包装上的批号来查找并下载产品的 COA,每批产品都进行了严格的验证,您可放心使用!

找到3个结果

批号(Lot Number) 证书类型 货号
C2416001 分析证书 P598273
B2426805 分析证书 P598273
B2426804 分析证书 P598273

溶液计算器